

WordPress is one of the most used open source software in the world. Therefore it is important to be vigilant and protect it as best as possible.
A hacker can use data however he wants! Know that WordPress is one of the most popular content management systems in the world! It has been installed over 76.5 million times.
ESSENTIAL SECURITY SOLUTIONS FOR YOUR WORDPRESS SITE
1. Keep your WordPress updated
This will allow you to secure WordPress effectively, believe me! And yes, it seems simple, but only 22% of WordPress sites use the latest version! Between us, who has never been lazy not to update their site? If you want to have a clean and virus-free website, it’s a must!
WordPress incorporated auto-update in version 3.7, however, it only works for small security updates. So, major updates must be done manually to secure WordPress!
2. Use Less Common Login Information
Are you using admin as your WordPress admin username? If your answer is yes, know that it will be easier to hack you. So now change the username! You can also create a new Administrator account with a different username and delete the old one. If you prefer this method, follow these simple steps:
- Access the WordPress Dashboard
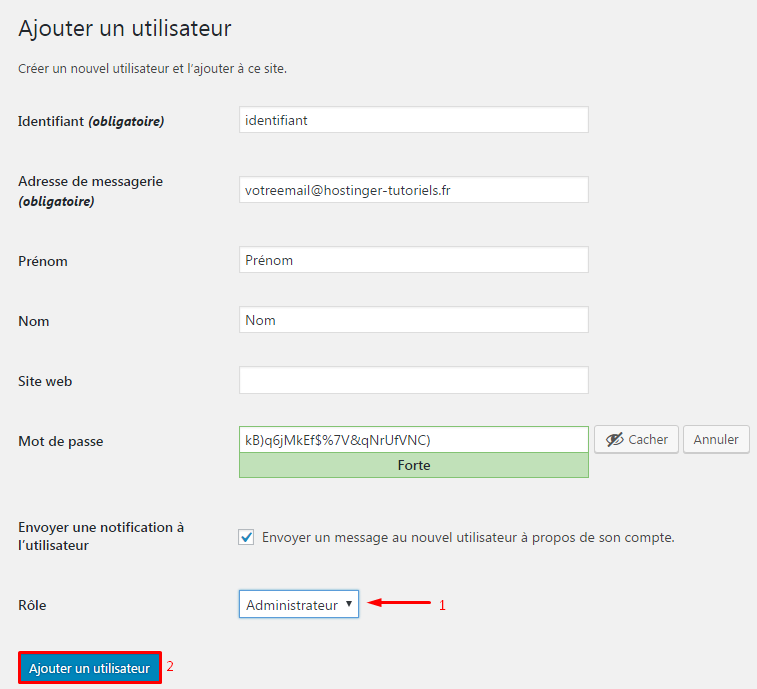
- Go to the Users section and tap Add .
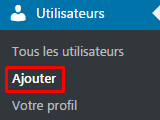
- Create a new user and assign them an Administrator role.
- Re-login to WordPress with your new username.
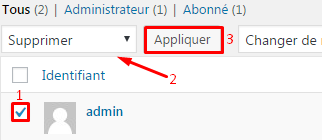
- Return to the Users section and delete the Admin user.
A good password is the key to effectively securing WordPress. It is much more difficult to force a password that consists of numbers, upper and lower case letters, and special characters. Tools like LastPass and 1Password can help you create and, above all, manage complex passwords!
3. Enabling two-step authentication
Two-step verification allows you to keep WordPress as secure as possible. As the name suggests, it adds another step that you will need to complete to log in. It is very likely that you already use it to access your emails, your bank or any other account containing sensitive information. So why not use it on WordPress?
Although it may seem complicated, today there are simple solutions to use this two-step verification. All you need to do is install a 2-step authentication app (on your phone for example) and set up WordPress. You will find a detailed guide on enabling WordPress two-step authentication here -in English-.
4. Disabling PHP Error Reporting
PHP error reporting can be useful if you’re a web developer and want to make sure everything is working correctly. However, showing errors publicly is a major security breach!
You need to fix this ASAP! Rest assured, you don’t need to be a coder to disable PHP error reporting for WordPress! Many hosting providers will offer you the option to disable error reporting in the control panel. If it doesn’t offer this, simply add the following lines to your wp-config.php file. You can use your FTP client or File Manager to edit wp-config.php .
error_reporting(0);
@ini_set('display_errors', 0);
That’s all ! Error reporting is now disabled
5. Don’t use cracked WordPress plugins
“If it’s free, you are the product” The same goes for a majority of pirated software! If you want to secure WordPress and use it especially for professional purposes, use what you pay for!
There are thousands of pirate plugins and themes on the Internet. Users can download them for free from various Warez or torrent sites. Unfortunately, most of them are infected with malicious links or blackhat SEO.
If you want a healthy site, stop downloading cracked plugins because you will end up paying more for a seasoned developer to clean up your website!
6. Scan WordPress with anti-virus
Hackers often use vulnerabilities in themes or plugins to infect WordPress with malware. Therefore, it is crucial to scan your blog frequently to secure WordPress! There are many extremely well-coded plugins for this use! WordFence is the plugin that stands out. It is easy to use and complete! It offers manual and automatic scanning options as well as many different settings. You can even restore modified/infected files in just a few clicks. And on top of that, it’s free and open source. So, hurry up and install this plugin!
Other popular WordPress security plugins:
- BulletProof Security – unlike WordFence, which we described earlier, BulletProof will not scan your files, but it will mainly provide you with a firewall and additional database security. The good thing about this plugin is that it will be configured and installed in just a few clicks!
- Sucuri Security – this plugin will protect you from DDoS attacks, it will keep a blacklist, scan your website and control your firewall. If it detects something, it will notify you by email. Google, Norton, McAfee – all these engines are included in this plugin to give you maximum security.
7. Migrate your WordPress site to more secure hosting
This may seem like strange advice, but statistics show that over 40% of WordPress sites have been hacked due to security vulnerabilities in the hosting accounts themselves! This is also very important advice if you want to secure WordPress! This statistic should make you reconsider your current hosting choice and migrate your WordPress site to more secure hosting. There are a few key facts to consider when looking for new accommodation:
- If it is shared hosting, make sure that your account is isolated from other users and that there is no risk of just one of the websites infecting all the others on the server.
- It should make automatic backups.
- It must have a server side firewall and antivirus.
8. Back up as often as possible
Even the biggest websites are hacked every day despite their owners spending thousands to secure WordPress.
Even if you have good habits and complete the other tips in this article, it is still crucial to back up your site regularly.
There are several ways to create a backup. For example, you can manually upload WordPress files and export the database or use your host’s backup tool. But you can also use backup plugins. The most popular WordPress backup plugins are:
You can even automate the backup process and store your WordPress backups in Dropbox.
9. Disabling File Editing
As you may know, WordPress has a built-in file editor that allows editing PHP files. Although this feature is very useful for developers, it can also be fatal! If the attacker gains access to your admin board, the first thing he will look for is this same editor. It will trash all your files and it will be the end of your site. Some people (like us) disable this feature completely to secure WordPress. It can be disabled by editing the wp-config.php file and including the following line of code:
define( 'DISALLOW_FILE_EDIT', true )
Yes, as you see, with just a few lines of code, we can better secure WordPress!
IMPORTANT If you want to re-enable this functionality, use your FTP client or your host’s file manager and remove this same code from the wp-config.php file.
10. Remove unused themes and plugins
To have better security on WordPress, clean up your WordPress site and remove all unused plugins and themes. Hackers often look for disabled and outdated themes and plugins (even official ones!) and use them to access your dashboard or send malicious files to your server. By removing plugins and themes that you have stopped using (and may have forgotten to update), you will reduce the risk of WordPress hacking.
11. Use htaccess to its full potential
The .htaccess file is necessary for WordPress links to work correctly. Without correct rules in that same .htaccess file, you would get a lot of 404 errors. This may seem complicated, I admit. But rest assured, everything has been done for you!
Few users know that .htaccess can be used to secure WordPress. For example, with .htaccess you can block PHP access to specific folders. The examples below show how to use .htaccess to secure WordPress
IMPORTANT Before making any changes, it is strongly recommended to backup the .htaccess file and keep a copy of it, just in case. You can use your FTP client or File Manager for this.
Prohibit access to the WordPress Administrator area
The code below will allow access to the administration area to certain IP addresses only (yours?).
AuthUserFile /dev/null
AuthGroupFile /dev/null
AuthName "WordPress Admin Access Control"
AuthType Basic
<LIMIT GET>
order deny,allow
deny from all
allow from xx.xx.xx.xxx
allow from xx.xx.xx.xxx
</LIMIT>
You need to edit XX.XX.XX.XXX and replace it with your IP address. You can use this website to find out your current IP. If you use more than one connection to manage your WordPress site, be sure to include any other IPs you use (feel free to add as many lines as you like). However, do not use this code if you have a dynamic IP address.
Disabling PHP execution in certain folders
Hackers like to upload backdoor scripts to the WordPress download folder. By default, this folder is used to download media files only. So it should not contain PHP files. You can easily disable PHP execution by creating a new .htaccess file in /wp-content/uploads/ with these rules:
<files *.php>
deny from all
</files>
Protect the wp-config.php file
The wp-config.php file contains basic WordPress settings and MySQL database details. So it is the most important WordPress file. This is why it is the main target of all WordPress hackers. However, you can easily protect this file using .htaccess rules:
<wp-config.php files>
order allow,deny
deny from all
</files>
With these few lines you have just significantly improved the security of WordPress!
12. Change the Default WordPress Database Prefix to Avoid SQL Injections
The SQL database contains and stores all the information your site needs to function. As a result, it becomes a prime target for hackers and spammers who then execute automated code and perform SQL injections. When installing WordPress, most people don’t bother to change the default database prefix which is wp_ . According to WordFence , 1 in 5 WordPress hacking cases are due to SQL injections. Since wp_ is the default setting , attackers will choose to target this value first. In this step, we will briefly explain how you can secure WordPress against such attacks.
Changing the table prefix for an existing WordPress site
IMPORTANT! Since we’re talking about WordPress security, make sure to back up your MySQL database before continuing.
Part 1 – Changing prefix using wp-config.php
Using your FTP client or File Manager – in English – open your wp-config.php and look for the $table_prefix value.

You can add numbers, letters or hyphens. Save your changes and move on to the next step. In this tutorial, we will use wp_1securite2_ as our new table prefix.
In your wp-config.php file , also look for your database name, so you know which database you need to modify. define(‘DB_NAME’

Part 2 – Updating all database tables
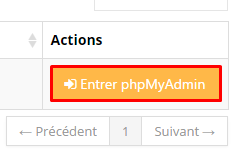
Now you will need to update all entries in your database to secure WordPress. To do this we will use phpMyAdmin!
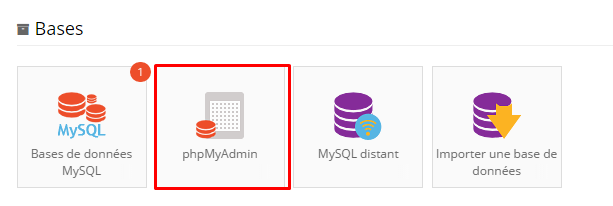
Navigate this to the database you searched for in Part 1.
A typical WordPress installation has 12 tables. Each must be updated. Please note that you can do this quickly in the SQL section of phpMyadmin.
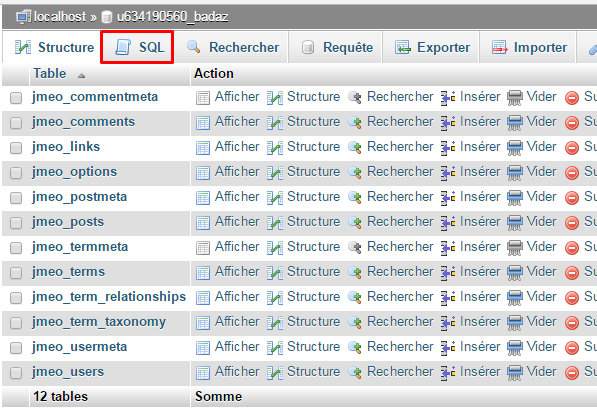
We will use SQL queries to speed up the process. Indeed, you like me don’t want to spend hours updating the tables manually! Use the following syntax to update all tables in your database.
RENAME table `wp_commentmeta` TO `wp_1securite2_commentmeta`;
RENAME table `wp_comments` TO `wp_1securite2_comments`;
RENAME table `wp_links` TO `wp_1securite2_links`;
RENAME table `wp_options` TO `wp_1securite2_options`;
RENAME table `wp_postmeta` TO `wp_1securite2_postmeta`;
RENAME table `wp_posts` TO `wp_1securite2_posts`;
RENAME table `wp_terms` TO `wp_1securite2_terms`;
RENAME table `wp_termmeta` TO `wp_1securite2_termmeta`;
RENAME table `wp_term_relationships` TO `wp_1securite2_term_relationships`;
RENAME table `wp_term_taxonomy` TO `wp_1securite2_term_taxonomy`;
RENAME table `wp_usermeta` TO `wp_1securite2_usermeta`;
RENAME table `wp_users` TO `wp_1securite2_users`;
Some WordPress themes or plugins may create additional tables in the database. In case you have more than 12 tables in your MySQL database, add the rest to the SQL queries manually and run them.
For example :
RENAME table `wp_tabledevotreplugin` TO `wp_1securite2_tabledevotreplugin`;
Where you will replace table of your plugin with… the table created by it!
Part 3 – Verification options and usermeta tables
Depending on the number and type of plugins installed, some values in your database will need to be updated manually. To do this you will need to execute SQL queries to look for these values in the wp_1securite2_ options table and the wp_1securite2_ usermeta table .
For the options table , you will need to run:
SELECT * FROM `wp_1securite2_options` WHERE `option_name` LIKE '%wp_%';
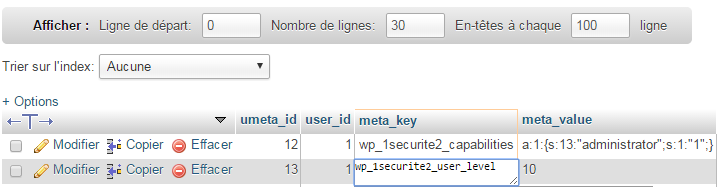
For the usermeta table , you will need to run:
SELECT * FROM `wp_1securite2_usermeta` WHERE `meta_key` LIKE '%wp_%'
When you have obtained the results of the SQL query, you simply need to update all the values from wp_ to wp_1securite2_ (in our example) and you will be done. In the usermeta table you will need to modify the meta_key value , while in options the option_name value will need to be modified.
Changing the table prefix for a new WordPress site
If you plan to install new sites under WordPress, there will be no need to carry out this tedious process. You can simply change your table prefix to secure WordPress during installation:

Congratulations ! You have successfully increased WordPress database security!


