
The Facebook pixel! Does that speak to you? It’s a small tracker that allows you to increase the conversion rate of Facebook Ads . It is essential when you regularly advertise via Facebook to promote your products and services. So How to install the Facebook pixel to target your advertisements?
Find out how to install it after the few changes made by Facebook to the procedure.
Facebook Advertising and Facebook Pixel
Are you used to using Facebook advertising and do you use it to carry out your web marketing strategy ? Don’t forget to use the Facebook pixel to track your visitors and thus improve the conversion rate of your Facebook Ads.
In this article we will tell you about the Facebook pixel which aims to target Internet users likely to be interested in your content, your services or the products that you present on your website. This pixel is to be associated with your Facebook advertising campaigns .
What is the Facebook pixel?
The Facebook pixel is therefore a small tracker which allows you to monitor the conversions of your Facebook advertisements. It allows you to track your visitors and know which pages they go to to see your products/services and therefore whether they finalize (or not) a purchase.
For example, when you view an item on a merchant site and ultimately do not buy it, you will subsequently find it on the social network Facebook in the advertising feed or elsewhere on other websites than you will visit. This Facebook pixel has a function that allows you to contact your potential customers in order to convert them.
Thanks to it, it is possible to follow up with visitors to your site who have not completed a purchase and thus improve the targeting and conversion rate of your Facebook advertisements. The advertisements will thus appear on the inserts of different websites or other channels broadcasting advertising, which they will visit.
Pixel Facebook: what are the advantages of integrating it into your website?
Integrating the Facebook pixel into your website offers the major advantage of being able to broadcast targeted advertisements on Facebook to Internet users who have visited your site. To make this action possible, the pixel saves cookies from visitors to your site.
This method is called remarketing or even retargeting . The benefits of this advertising strategy are relatively numerous, the pixel helps you target people who have already visited your site on the one hand, identify the pages they have browsed, and on the other hand know the actions carried out by the Internet user.
So, if they have validated a form or subscribed to your newsletter, you are informed thanks to the installation of the Facebook pixel. All this gives you the possibility of automatically sending them personalized ads on their Facebook news feed .
This pixel is a real sales opportunity for online stores , which can in this way recover a portion of people who have not completed their purchases. It is therefore essential to install it when you advertise on Facebook to maximize your chances of conversion.
The social network Facebook has more than 33 million users per month in France, so it is a powerful marketing space to boost sales .
To better understand Facebook advertising and how Facebook Ads work, read this article first: Facebook Advertising Guide. This guide article will help you know how to create effective Facebook advertising and, above all, how to create targeted audiences by optimizing your advertising budget as best as possible.
How to install the Facebook pixel?
Recently, the installation of the Facebook pixel has evolved a little in terms of the procedure to follow via the advertising manager. We give you the step-by-step procedure using the example of installing the Facebook pixel on a WordPress site.
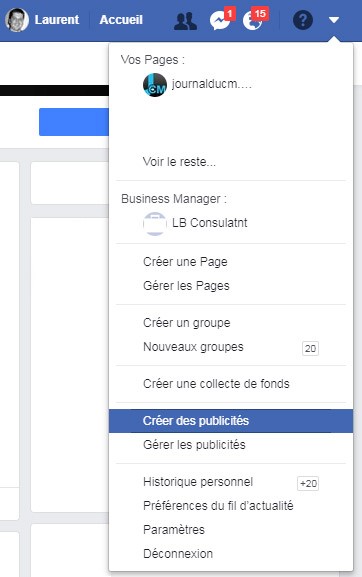
To install the Facebook pixel , you must first go to the Facebook business manager to retrieve your personal tracking ID. You will find it in your account by clicking on the “ Create ads ” link at the top right of the page (see below)
Once in the ads manager, you will need to retrieve the Facebook pixel by starting by accessing the menu at the top left (see visual below). Drag your mouse over All Tools at the bottom and then click on Pixels as shown below.
The announcement given by Facebook about pixels and the recently redesigned table: Welcome to the new pixels page
We’ve simplified the website data sent by each of your pixels. The redesigned dashboard shows all pixels associated with your account and displays generic event and activity data. You can compare the activity of multiple pixels or examine it over a period of time.
Click Details to see detailed information about each pixel. You can review the number and type of events received, analyze recent event activity, create audiences based on your pixel data, and create and manage custom conversions.
Then click on the blue button “ see configuration instructions ”
Facebook pixel setup instructions
You are now ready to install the Facebook pixel to ensure better conversion of your advertisements. When you arrive here, 3 solutions are available to you:
- Use an integration or tag manager
- Install the code manually
- Email instructions to a developer
If you have no knowledge of the installation or do not wish to take care of it, validate the 3rd option. This method will automatically send an email to your developer or to a person who will be authorized to follow the instructions and install the Facebook pixel for you.
If you want to do it yourself, you can choose the integration method or tag manager or even manually install the code.
Method 1: Use an integration
Via the first option consisting of integrating the Facebook pixel code, you will need to choose your partner. To tell you how to proceed, we will opt for WordPress which is the most used CMS to date for creating websites.
Choose yours or click “request a new partner” if it is not listed.
Facebook pixel integration via WordPress
After opting for the WordPress partner, follow the instructions one by one starting by downloading the plugin which contains the Facebook pixel by clicking on the Download button and then clicking on Next
After downloading, go to your WordPress back office by selecting Extensions / Add in the side menu. Click at the very top of the WordPress back screen on Upload an extension and then Choose a file : find the plugin (Facebook Pixel) that you have just downloaded and finally click on Install .
Once the extension is installed, click Activate Extension to make it functional. You will find the extension under the name Facebook Pixel in your list of plugins. Below you can click on settings if necessary.
Here is the visual below (in English) which can help you identify where to click: Plugins = Extensions on the French menu and Add New = Add
Click Next again and check in the Facebook Ads Manager that your pixel is active by selecting Pixels again from the menu at the top left.
You should see it appear with values and a Details button to navigate to your Facebook Pixel dashboard. If this is not the case, check that you have followed all the steps one by one and that your plugin has been activated if you installed the pixel via WordPress.
In the worst case, start the procedure again if it didn’t work.
Read More: Creation and Design of your website


